Posted By Rabbitohs on 30 Oct 2009 03:22 PM
Late War GT Pioneer Report
Back from a big weekend in Auckland and I’m lucky enough to have some time to write a tournament report – although I forgot my camera so no photos from me this time around. I have stolen some from my club mate Nick Garden though – so all image credits go to him. First of all, thanks to all those guys in ‘The Regiment’ who helped with preparation and especially John who kindly offered accommodation. Secondly, thanks to all my opponents; every game was enjoyable and played in good spirit. Thirdly, thanks to Battlefront for running a good tournament, and particularly for the pre-tournament information. For people travelling from a distance this makes things a lot easier.
Please note that I apologise in advance for any errors, or any offence given. I’ve also attempted to sound like a level-headed gamer and not an arrogant nasty, but it is hard to tell how words on the internet will be received. The whole purpose of this report is to share my experiences which will hopefully help other gamers enjoy their hobby more. Again, sorry if I sound like a w#@*er!
Force Selection
Some forum members believe that you need to be lucky to be a good player. Everybody is entitled to their opinions, but my response is ‘Nuts!’ In my opinion the relationship between force selection and tournament success is a close one, although some people do manage to ‘play outside the curve’ with particular forces. My initial two tournaments were played with German Armoured Panzer Grenadiers – ten games, ten losses. Some losses could be put down to my poor understanding of the rules, others to tactical errors. But a third were due to force miss-matches. Some forces have more mismatches than others, and that’s a fact. Another example was my flirtation with pre-Cobra American Armour; ten games and seven wins...but mostly 4-3. This will not win a tournament in most cases. I put this down to the trained rating of the list and the fact that most games were against historical opponents. Every opposition list had Panthers or Tigers which are very difficult to beat 6-1 with trained Sherman’s! Now, when preparing for a tournament, I have a long think about list selection.
For the GT things were a little different. Winning was not an objective as I’ve achieved what I want in that respect, but I did want to play one of the Americans. I knew they were very good players (the forum is good for gathering pre-tournament intelligence) so I figured I would need to be around the top ten to get a game with them. I thought that Jon was going to bring a Guards lists (got that one wrong) and Bill his British 7th Armoured, so to increase the chances of playing them I opted for Germans. Then my wife gave me a pair of Jagdpanthers for Christmas (bless) so I decided to build a force around them.
German Pioneers
The Pioneers have attracted a lot of negative attention on the forums, in particular the Panzer Pioneers with Panthers combination. This is a strong list with good synergy. Rather than getting upset about the perceived ‘cheesiness’ of certain lists, I tend to look at them and try to figure out how to deal with them. For example, once you have figured out a strategy for nullifying flamethrowers, they cease to cause too many difficulties. Another is Panthers – if you’re going to a LW competition without a good way to deal with Panthers, you will not win. Every nut can be cracked; you just need to make a good plan for each eventuality!
I had three primary fears about the LWGT – open terrain, Soviet tank hoards and veteran British Armoured lists. These are lists that I consider good candidates for tournament wins when terrain is quite open or offers opportunities to develop a mobile battle. It seems I was right to be scared with veteran British tanks in first and second, and a Soviet tank hoard taking best general! After pondering the two Jagdpanthers, and the four-year-old unopened blisters in my hobby room, I picked the German Pioneers as a list that could compete with these forces.
My Force:
HQ with one panzerfaust. I didn’t upgrade the 2ic as I planned to use him as a kampfgruppe and last reserve in most situations. With mission tactics I don’t think he is as important for the German armies.
Combat Platoon, full strength with panzerfaust and supply wagon. This was to be a main workhorse of the list, taking on most defensive and offensive work. Although equipped with rifles, in my style of play the infantry seldom fire except in defensive fire. Their role is to stay concealed and GTG. Mobile platforms add the MG fire needed to hold down infantry. I chose the leg Pioneers for the larger platoons – I wanted them to soak up the initial assault and then be able to hit back and survive a couple of assault rounds without needing a moral check.
Combat Platoon, full strength. No extras as this was to be butchered for the kampfgruppe or used for secondary work (for example at the back of a ‘cauldron’ or on the rear objective in HTL).
Support Platoon, four StuG Assault Guns. I had a long think about placing Panzer IVs in the mobile firepower support role, but decided that the StuGs would be better against my expected opponents due to the better front armour. As you will see from the following reports, the Panzer IV would have been better in most cases as the StuGs struggled when getting close and personal with infantry. The extra MG and the ability to use the turret to get defensive fire in the flank could have saved me a point in a couple of games.
Support Platoon, two Jagdpanther Tank Destroyers. My wife picked these when she got them for Christmas! With people reporting open terrain at Battlefront tournaments, I figured that they would be a good buy with very long range and excellent front armour. I also thought that they might be a distraction for opposing players leaving the other elements to do the damage.
Support Platoon, three nebelwerfers. I would have taken the Panzerwerfer if we had been using 1750 but I only had space for the cheapest of German template goodness. The rockets are excellent due to the ranging in benefits and can also fire smoke if required. I am yet to play a game where they have been subjected to counter-battery fire on the smoke trails so I think they are a steal.
Limited Air Support, HS-129b. I had another long think about Stukas vs. the HS-129b and the 2+ to hit won out. I figure that it’s hard enough to get planes on a 5+ and range them in, so you might as well pay the extra to get a certain hit! The air support picked up my ‘most valuable unit’ award and I would certainly consider using air again. The synergy between the Jagdpanthers (get close for side shots), Pioneers (stay away from the flame throwers) and HS-129b (get on with the game before it makes a difference) was powerful.
The Games
I enjoyed all of my games – wins and losses. Best of all I fulfilled my goal of playing one of the Americans (Bill Wilcox) and had Blue vs. Red each round. The terrain was also good in my opinion, even when it disadvantaged me I could see opportunities for taking the battle to the enemy, although not always successfully!
Game 1 Encounter vs. Jason Farley (Admiral)
Commandos (Fearless Veterans)
A Company HQ, Two Commando Troops, B Company HQ, Two Commando Troops, Commando Mortars, British Para Platoon, Two 17pdrs, Priority Air (Typhoons)
The table was relatively open but as this was an infantry vs. infantry battle this did not count for much. Interestingly Jason deployed his objective directly in front of mine on my side of the table making my defence a lot easier. With this in mind I deployed the two mobile platoons and the large engineers with the intention of attacking from the outset. As Jason had no mobile units he did the expected and dug in on each objective.
The game was unremarkable except for the fact that I over-committed to the attack and was caught out when Jason’s first reserve unit arrived on the right flank and advanced. He had an opportunity to win the game cleanly on about turn five when I forgot to move my supply wagon out of assault distance of this reserve commando unit (this assault and consolidation would have left him in undisputed control of two objectives!). Luckily for me Jason missed this as well, and I had an extra turn to move a team back to contest. From there I had the opportunity to win by overwhelming Jason’s objective, but several rounds of vicious assaults resulted in a dead Pioneer platoon, destroyed StuGs and a dead Para platoon. Three of Jason’s commando platoons were also destroyed as my reserves came on, but he passed his company moral check. With that time was up on a bloody 3-3 draw.
Man of the Match (MoM) went to the HS-129s. I held them to use against the priority Typhoons, and they ended up making four interceptions. Other than that Jason’s Typhoons only got through once and failed to destroy a Jagdpanther. The Nebelwerfer battery did a sterling job from reserve with several devastating bombardments – the ‘always hit on 3+ when ranged in’ is awesome. The commandos were very tough in assault (as expected) and having two company command stands for re-rolls was a major benefit. I think that we both did well to get three points out of this game! For those that are interested four out of six flamethrowers were fired (eight dice) for three kills.
Game 2 Fighting Withdrawal vs. Philip Porter
American Beach Landing Force (Confident Trained)
HQ, Dutch Cota, six Beach Landing Platoons, 8cm mortars, chemical mortars, 105mm battery, four DD Sherman’s.
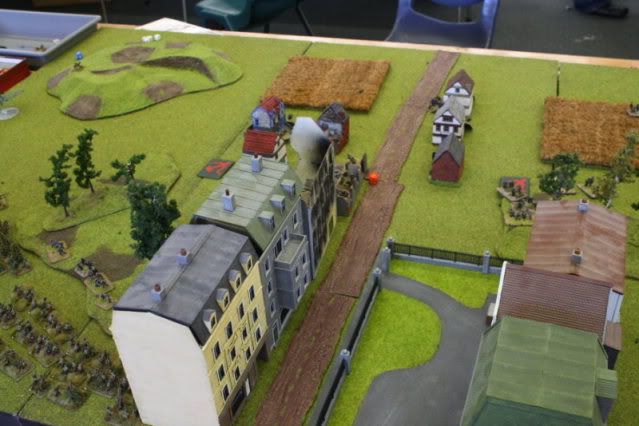
The table was relatively open with a large pair of buildings on one side. Philip was surprised that I opted for the other side of the table but I was hoping the buildings would split his force and force the centre platoons into a bottleneck. Here are the buildings (in a different battle):
As the Americans are an auto-attack force I set up my defence. Typically in FW the defenders objective is placed slightly off-centre so that it can be covered by a single platoon – the wire was also deployed here to help with defence. The other objective was covered by the second combat platoon while the Jagdpanthers were placed centrally to move to any threat. The StuGs were in ambush so that they could be integrated into the infantry live for defensive fire. Philip moved forward in a ‘wave attack’ with two combat platoons heading for each objective. Although this put pressure on everywhere, it meant that no attack was particularly strong. However, the game became an uphill battle from turn two after my HS-129bs and Nebelwerfers pinned six platoons, only one of which unpinned. That put Philips entire attack one turn behind and in this mission, especially with infantry, that is fatal.
The Jagdpanthers killed one Sherman and the remainder hid for the rest of the game. As the infantry closed the StuGs deployed integrated with the infantry and turned back three assaults. The infantry refused to unpin during the entire game so I was unable to withdraw them without a skill test – luckily I passed! As each assault was turned back the StuGs and Jagdpanthers moved across the table taking care of each objective as they came off. Philip was a real pleasure to play against and although he knew that he was in trouble after failing to unpin, he kept attacking without showing any poor graces. In the end it was a 6-1 to the Pioneers.
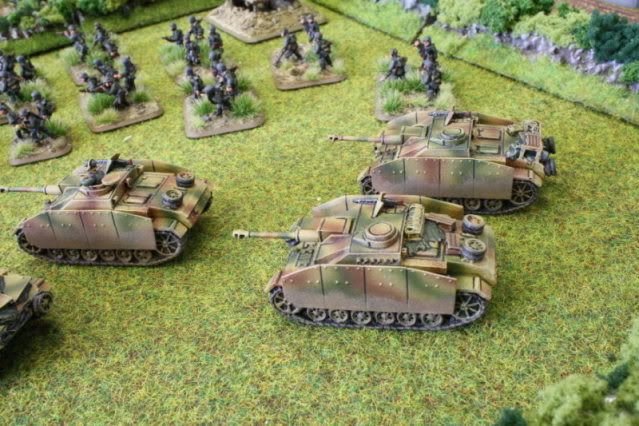
MoM went to the HS-129bs and the StuGs. By pinning four platoons in the first turn the planes sent the tone for the rest of the battle. They were a constant nuisance, and although they did not achieve a great about of kills they kept platoons pinned for the entire game. The StuGs, when the integrated into the line, must have broken Philips heart. They were deployed in the sweet-spot where they could not be hit by Philip’s flamethrowers but could fire in defensive fire. They single-handedly turned back several assaults that could have carried the day. For those that are interested, the Pioneers fired none of the flamethrowers in this game. Here are the StuGs in action:
Game 3 Cauldron vs. Gavin van Rossum (Meat)
Soviet Armoured Battalion (confident trained)
HQ T-34/85 with Tanko, 5 T-34/85 and 3 T-34/76 with Tankos, 4 T-34/85s and 2 T-34/76 (Dedov took one T-34/85), 3 ISU-122 with Tankos, Spetznaz.
I have thought about using tank riders before but have never really got my head around the rules. After almost receiving a whipping from them in this game I’m going to give them a much closer look!
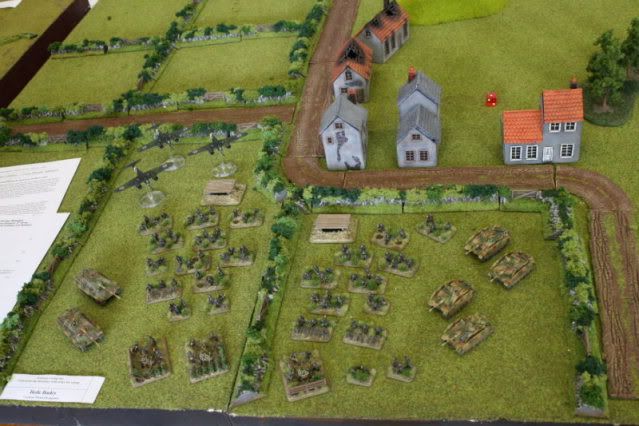
I deployed both Pioneer platoons in the middle of the ‘cauldron’ with pickets placed in each quarter to force back Gavin’s deployment. The Jagdpanthers were placed in immediate ambush to further threaten his set up. Gavin placed the large T-34 company and Dedov in on corner bunched up behind a hill. The IUS-122s were placed on the other side of the table behind another ridge. All riders remained dismounted for the game. In turn one the Jagdpanthers moved to shoot at one T-34/85, and destroyed it. The HS-129s arrived and ranged in on almost the entire big tank company, but all hits were allocated to the riders – stink! Gavin kept the T-34s in cover while manoeuvring towards my lines, while the ISU-122s popped out to snipe at the Jagdpanthers. Over three turns the Jagdpanthers killed two ISU-122s but they did not need to check moral with the tank riders still alive. Jagdpanther goodness:

The game had two defining moments. The first was when the Nebelwerfers set up and fired their first bombardment into the large tank company riders, hitting almost all of them. Gavin wanted to keep them alive for the assault next turn and so allocated one of the hits to Dedov, who was caught under the template. A long shot for the kill, but Gavin duly rolled a 1 for the armour save and I rolled a 5 for firepower! The second was during the following turn when Gavin launched his main assault with T-34s and riders (dismounted to clear buildings). After three rounds the main Pioneer platoon was heavily reduced, and in one further round would have been under half and off the objective with nothing near to contest. Luckily for me Gavin failed his moral to counter attack and it was the Soviets who had to withdraw. In my following turn every shot I could muster was poured into the large Tank Company who fell under half strength...then failed moral and re-roll. Unfortunately for Gavin Dedov had fled the field so it was farewell for the riders!
After that Gavin lacked the strength to push my mobile units off the objectives, but he did manage to finish off the large Pioneer platoon for a point. Well deserved too as I was on the ropes for three turns in the middle. This was a very enjoyable game with a lot of banter; I hope to play Gavin again some time. 5-2 to the Pioneers.
MoM went to the Jagdpanthers, although the HS-129bs and StuGs should get a mention in despatches. The Jagdpanthers killed numerous T-34s and all three ISU-122s, and moved forward to protect an objective in the end game. Both they and the StuGs sat back at the base of the ‘cauldron’ to avoid getting flanked by the Soviet units – this was a successful tactic as they had cover and managed to avoid fire from the T-34/85s for the entire game. The HS-129bs managed to kill a couple of T-34s throughout the game and also chimed in with some bails. For those that are interested, I fired one flamethrower that bailed one tank in the turn I was attempting to break the big company. I preferred to keep the Pioneers concealed and GTG and in my book if you move and fire a flamethrower you lose GTG for the platoon.
Game 4 Breakout vs. Michael Hamilton
British Guards Armoured (Confident Veterans)
HQ, 2 Sherman platoons with one Firefly each, 4 Stuarts, Column March platoon, Guards Infantry platoon, limited Typhoons
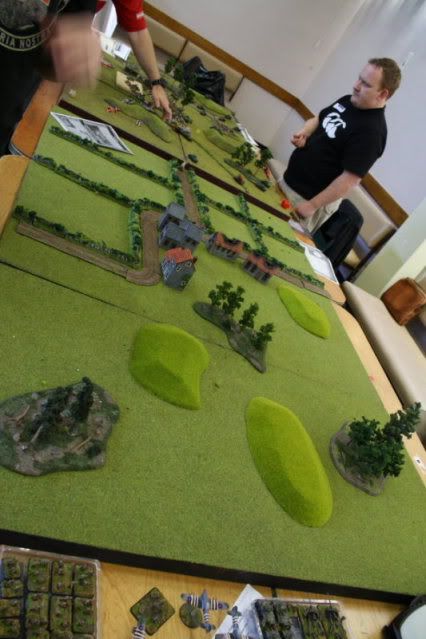
This would normally be a difficult match-up for my force (in this mission) but luckily half of the board was boscage. This enabled me to move the Pioneers quickly to within striking distance of the objectives, making sure they were only one turn from contesting. My mobile AT was then in a position to whittle down the Sherman platoons before the infantry was forced to engage. Here is the table:
Michael moved his two Sherman platoons onto the objectives in turn one. The Pioneers stayed in cover and waited for the StuGs to do take their toll. Over four turns they destroyed several Shermans, while the HS-129s attempted (successfully) to intercept the Typhoons. The Jagdpanthers were held in reserve due to their long range (they could fire across the objectives as soon as they arrived but missed every shot during this game. The StuGs were outstanding, passing skill checks, bog tests and hitting every turn. On turn five I would have had to fail four 4+ moral checks to lose the game, but I passed the first one to move some Pioneers to contest. The following turn I either shot or assaulted what was left of Michael’s army, destroying every remaining unit in the process. Michael was very knowledgeable of the rules and played the game in a very good spirit, even when he knew he was in trouble. It’s always a pleasure to share a game like this! 6-1 to the Pioneers.
MoM were the StuGs without doubt. Although Michael could have engaged them more aggressively, they were always in cover and he would have needed to move to hit them. Using the terrain they swept the open objective area, effectively breaking the Shermans. The Nebelwerfers also did a sterling job breaking up the infantry as Michael had left them too bunched. The flamethrowers were a great deterrent, but only fired once the game had been decided, with two firing to knock out the carriers.
Game 5 No Retreat vs. Bill Wilcox (Gothmog)
British 7th Armoured Division (Reluctant Veterans)
HQ, 3 Cromwell platoons with 1 Firefly each, 3 Stuarts, Infantry plt, 4 M10 17pdrs.
With Bill and I only a point apart, I was really pleased to find that we would be contesting the penultimate round. Happily for me, I had achieved my goal for the weekend! I knew it would be a tough match-up for him but he was ever the gentleman, keen to get into the game and teach me a lesson.
Normally I would deploy the large Pioneer platoon and Jagdpanthers, with the StuGs in ambush. In this case I decided to deploy both infantry platoons in lieu of the Jagdpanthers as I was concerned that the speedy Cromwells would not give me the chance to whittle them down before they were in side-shot range. I deployed the platoons intermixed between the two objectives, with the StuGs waiting to pop out of ambush when the Jagdpanthers arrived.
Bill played the classic 7th Armoured game, rushing forward to deny ambush spots and prepare for the early ambush. He bunched up the M-10s to cover the advance of one combat platoon, and I hit them with the HS-129bs. Good shooting saw two destroyed; the 2+ to hit and AT 9 is murder on lighter vehicles. Bill attempted one early assault which resulted in a couple of dead Pioneers but three dead Cromwells. In the following turn the Jagdpanthers arrived and I sprung the ambush, hoping to remove another platoon. I moved two flamethrowers forward - four failed skill tests. The StuGs fired hitting on 4+ – two bailed Cromwells (one being the 2ic). The Jagdpanthers added a couple of shots – misses. Bill gave me a condolence hug as he could see that that was the turning point from a 6-1 win to a possible defeat!
Over the remaining turns we both struggled to get the upper hand; by now we all had our units concealed so it took many turns of shooting to bring each force down to size. The HS-129bs managed to pin the infantry, keeping them out of the game for several vital turns, forcing Bill to assault the Pioneers on the front objective with Stuarts and the odd Cromwell. With some good moral rolls for the Germans, the Pioneers came out on top, but were shot to pieces in the end. The StuGs also fell after multiple rounds of shooting, but the Jagdpanthers and HS-129s kept knocking out armoured targets. Eventually a fourth platoon was killed (I think it was the last M-10) and as the CO had died on the objective I won the game 4-3 on a company moral failure (fitting for a reluctant force).
This was easily one of the best games I have played in terms of fun, and it was certainly a tactical challenge. Bill was a fantastic opponent and we both had plenty of opportunities to win the game. We enjoyed some good laughs throughout and at the end had a small crowd popping by the check how things were progressing. With his beautifully painted army Bill finished second in the generalship stakes and was a deserved winner of the tournament.
MoM was again the HS-129bs. If they had not been able to pin the infantry and destroy several armoured targets, I never would have recovered from the failed ambush and terrible shooting that followed. The intermingled Pioneer platoons also did a sterling job of covering the objectives; it was the 10-stand strength that made the difference rather than the flamethrowers. The flamethrowers fired of course, but only managed three bails during the entire game!
Game 6 Free for All vs. Rob Sadler
British Coldstream Guards (Confident Veteran)
HQ + extra Sherman, 2 Sherman platoons each with one Firefly, 4 17pdr M-10s, 4 Sextons, carrier patrol.
One look at the table was enough to convince me that this was going to be an uphill battle as it was very open – especially on the side that I was asked to play on. However, I had spent some time thinking about this mission and this type of force, so I did have a plan. I hoped to quickly dig in both Pioneer platoons and then use the Jagdpanthers and HS-129bs to wear down his Sherman platoons so that I could advance in the final hour of the game. Rob on the other hand went for the quick victory.
In turn one Rob advanced across the board and killed a Nebelwerfer and a couple of infantry stands (the carriers had a recon move). None of my units dug in (gulp) but the HS-129s and Jagdpanthers did kill a couple of Shermans. In turn two Rob continued to advance, killing more of the Pioneers in the open with MG fire. They were starting to look grim and needed to dig in. Of course they failed, and I realised that the StuGs would need to move towards the objective in order to contest. The HS-129bs and Jagdpanthers again killed a couple of Shermans; at least they were pulling their weight! I thought I was still in the game – until Rob opened fire on my StuGs. They were concealed and at long range, so Rob needed to roll 6s. Cue six rolls and six 6s! The StuGs were broken and the way was open for the carriers to clear the objective, which they did. I had one turn to gather a point – the HS-129s picked up one tank and the Jagdpanthers another. That forced a moral check on one Sherman platoon which was failed. That was one of the fastest 5-2 losses I have experienced but when your boys won’t dig holes its only to be expected. Rob made the most of the situation (like any good general!) and finished me off. Perhaps I should have moved the Jagdpanthers to cover the objective rather than the StuGs, but who would count on six 6s!
Rob and I had played in the last round of three of the last four tournaments I’ve attended and I’m yet to defeat him – the best result being a 3-1 draw to me. I now look forward to another chance to play Rob as I genuinely feel that we have good tactical struggles with a strong competitive edge. Now that we know each other away from the gaming tables things are even more fun. Although I got spanked in this game I still enjoyed myself! Rob went on to claim best general with the most VP points and was second overall.
MoM was shared between the Jagdpanthers and the HS-129bs. If the Pioneers had dug in I could have made Rob work a little harder for the win, as the open terrain did give the AT 16 guns time to work their magic. The Pioneers who failed...never again.
Postscript
As with any tournament scored by the battlefront system, the placings can be a bit of a lottery with the soft scores having such high importance. I believe that I finished on 26 victory points which put me fifth for generalship. My army only managed seventeenth against some high quality opposition but I managed to top to sports scores – the combination of the three putting me up to third overall. I must say thank you again to all of my opponents; this tournament really revitalised my interest in the game and will keep me motivated for a good while yet! Without cool opponents the tournament scene would be a wreck and I look forward to playing with you all again someday.
As I’ve been such a loud supporter of the top VPs = tournament winner argument, I decided to give most of the prizes I received away so that I wouldn’t feel like such a hypocrite. (On a side note I thought the prizes were cool.) The happy recipients? A young fellow at the tournament and my gaming group down in Wellington, all of whom are a great bunch of guys to game with. I did hold on to the special edition ‘not for commercial sale’ gaming set as it is a nice piece of memorabilia, and of course the fortification set

.
Thoughts on the Force
As others around the world have demonstrated, the Pioneer infantry are a viable tournament force. I believe it is due to the large platoon size but others will point to the flamethrowers. I’m going to leave them now, and see if I can cope without! The HS-129bs will become a regular in my German armies as I found them an excellent source of force projection. Hitting on 2+ is excellent and having the Jagdpanthers in the list allowed them to concentrate on medium armour and tank destroyers. The Nebelwerfers were also excellent value and the StuGs provided the heavy lifting for the force.
Thoughts on the Tournament
I enjoyed the tables (yes, even the open one in game six as I still felt I had a chance to win if lady luck had been on my side) and the clear scoring schedule. Battlefront was good throughout, and the talk from JP at the end was a highlight. It was fantastic to have visitors from Australia and the US as well. I still have my concerns about the scoring system, but I’m still happy to attend...in the last tournament I was knocked back by soft scores and this time I was picked up; perhaps there was some karma in action in Auckland over the weekend? I must admit that travelling and staying as a group (Hutt Miniature Wargames Club) did make the tournament extra-special and it would be awesome to travel with those guys again.
Thanks for reading, and I look forward to more awesome games in 2010.


